ASP.NET打造窗体身份验证及角色权限管理代码示例
- 时间:2015年04月02日 15:42:14 来源:魔法猪系统重装大师官网 人气:18000


ASP.NET MVC 建立 ASP.NET 基础之上,很多 ASP.NET 的特性(如窗体身份验证、成员资格)在 MVC 中可以直接使用。本文旨在提供可参考的代码,不会涉及这方面太多理论的知识。
本文仅使用 ASP.NET 的窗体身份验证,不会使用它的 成员资格(Membership) 和 角色管理 (RoleManager),原因有二:一是不灵活,二是和 MVC 关系不太。
一、示例项目
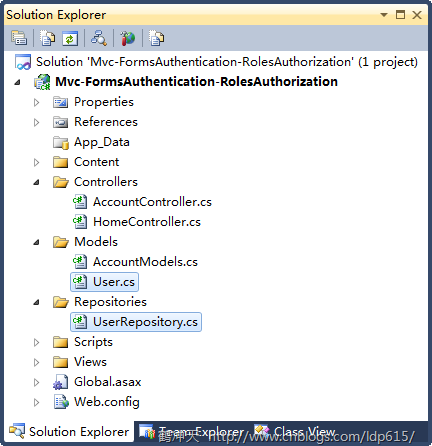
User.cs 是模型文件,其中包含了 User 类:
public class User
{
public int ID {
get; set;
}
public string Name {
get; set;
}
public string Password {
get; set;
}
public string[]
Roles { get; set; }
}
UserRepository 为数据存取类,为了演示方便,并没有连接数据库,而是使用一个数组来作为数据源:
public class UserRepository { private static User[] usersForTest = new[]{ new User{ ID = 1, Name = "bob", Password = "bob", Roles = new []{"employee"}}, new User{ ID = 2, Name = "tom", Password = "tom", Roles = new []{"manager"}}, new User{ ID = 3, Name = "admin", Password = "admin", Roles = new[]{"admin"}}, }; public bool ValidateUser(string userName, string password) { return usersForTest .Any(u => u.Name == userName && u.Password == password); } public string[] GetRoles(string userName) { return usersForTest .Where(u => u.Name == userName) .Select(u => u.Roles) .FirstOrDefault(); } public User GetByNameAndPassword(string name, string password) { return usersForTest .FirstOrDefault(u => u.Name == name && u.Password == password); } }
二、用户登录及身份验证
方式一
修改 AccountController:原有 AccountController 为了实现控制反转,对窗体身份验证进行了抽象。为了演示方便,我去除了这部分(以及注册及修改密码部分):
public class AccountController : Controller { private UserRepository repository = new UserRepository(); public ActionResult LogOn() { return View(); } [HttpPost] public ActionResult LogOn(LogOnModel model, string returnUrl) { if (ModelState.IsValid) { if (repository.ValidateUser(model.UserName, model.Password)) { FormsAuthentication.SetAuthCookie(model.UserName, model.RememberMe); if (!String.IsNullOrEmpty(returnUrl)) return Redirect(returnUrl); else return RedirectToAction("Index", "Home"); } else ModelState.AddModelError("", "用户名或密码不正确!"); } return View(model); } public ActionResult LogOff() { FormsAuthentication.SignOut(); return RedirectToAction("Index", "Home"); } }
修改 Global.asax:
public class MvcApplication : System.Web.HttpApplication { public MvcApplication() { AuthorizeRequest += new EventHandler(MvcApplication_AuthorizeRequest); } void MvcApplication_AuthorizeRequest(object sender, EventArgs e) { IIdentity id = Context.User.Identity; if (id.IsAuthenticated) { var roles = new UserRepository().GetRoles(id.Name); Context.User = new GenericPrincipal(id, roles); } } //... }
给 MvcApplication 增加构造函数,在其中增加 AuthorizeRequest 事件的处理函数。
代码下载:Mvc-FormsAuthentication-RolesAuthorization-1.rar (243KB)
方式二
此方式将用户的角色保存至用户 Cookie,使用到了 FormsAuthenticationTicket。
修改 AccountController:
public class AccountController : Controller { private UserRepository repository = new UserRepository(); public ActionResult LogOn() { return View(); } [HttpPost] public ActionResult LogOn(LogOnModel model, string returnUrl) { if (ModelState.IsValid) { User user = repository.GetByNameAndPassword(model.UserName, model.Password); if (user != null) { FormsAuthenticationTicket ticket = new FormsAuthenticationTicket( 1, user.Name, DateTime.Now, DateTime.Now.Add(FormsAuthentication.Timeout), model.RememberMe, user.Roles.Aggregate((i,j)=>i+","+j) ); HttpCookie cookie = new HttpCookie( FormsAuthentication.FormsCookieName, FormsAuthentication.Encrypt(ticket)); Response.Cookies.Add(cookie); if (!String.IsNullOrEmpty(returnUrl)) return Redirect(returnUrl); else return RedirectToAction("Index", "Home"); } else ModelState.AddModelError("", "用户名或密码不正确!"); } return View(model); } public ActionResult LogOff() { FormsAuthentication.SignOut(); return RedirectToAction("Index", "Home"); } }
修改 Global.asax:
public class MvcApplication : System.Web.HttpApplication { public MvcApplication() { AuthorizeRequest += new EventHandler(MvcApplication_AuthorizeRequest); } void MvcApplication_AuthorizeRequest(object sender, EventArgs e) { var id = Context.User.Identity as FormsIdentity; if (id != null && id.IsAuthenticated) { var roles = id.Ticket.UserData.Split(','); Context.User = new GenericPrincipal(id, roles); } } //... }
代码下载:Mvc-FormsAuthentication-RolesAuthorization-2.rar (244KB)
三、角色权限
使用任一种方式后,我们就可以在 Controller 中使用 AuthorizeAttribute 实现基于角色的权限管理了:
[Authorize(Roles = "employee,manager")] public ActionResult Index1() { return View(); } [Authorize(Roles = "manager")] public ActionResult Index2() { return View(); } [Authorize(Users="admin", Roles = "admin")] public ActionResult Index3() { return View(); }
四、简要说明
MVC 使用 HttpContext.User 属性进行来进行实现身份验证及角色管理,同样 AuthorizeAttribute 也根据 HttpContext.User 进行角色权限验证。
因些不要在用户登录后,将相关用户信息保存在 Session 中(网上经常看到这种做法),将用户保存在 Session 中是一种非常不好的做法。
也不要在 Action 中进行角色权限判断,应该使用 AuthorizeAttribute 或它的子类,以下的方式都是错误的:
public ActionResult Action1() { if (Session["User"] == null) { /**/} /**/ } public ActionResult Action2() { if (User.Identity == null) { /**/} if (User.Identity.IsAuthenticated == false) { /**/} if (User.IsInRole("admin") == false) { /**/} /**/ }
若本文中有错误或不妥之处,敬请指正,谢谢!